Building strength and mobility in your lower legs doesn’t have to cost a fortune! The tibialis anterior, a crucial muscle for athletic performance and injury prevention, can be trained effectively with a Tib Bar.
This guide will walk you through step-by-step instructions for crafting a DIY Tib Bar and provide a ready-made alternative if DIY isn’t your thing.
RELATED: How To Do Tib Raises Without a Tib Bar: 5 Home Gym Hacks
How to Build a Tib Bar:
Making a Tib Bar at home requires minimal materials and tools, most of which you might already have. Here’s what you’ll need:
Materials:
- 1” PVC Pipe (about 12-15 inches): Acts as the bar’s core.
- Foam or Tape: For grip and comfort.
- Weight Plates: Standard or Olympic plates to load on the bar.
- Carriage Bolt (5/16-inch, 6-8 inches long): To secure the plates.
- Washers and Wing Nuts: Ensures the plates stay in place.
Tools:
- Drill: For creating holes in the PVC pipe.
- Measuring Tape: To ensure precise cuts and placements.
- Saw: To cut the PVC pipe to size.
- Screwdriver/Wrench: To tighten the bolt securely.
Step-by-Step Instructions
Follow these steps to build your Tib Bar:
1. Prepare the PVC Pipe
- Measure and cut the PVC pipe to your desired length (12-15 inches is ideal).
- Smooth the edges with sandpaper to avoid sharp edges.
2. Drill Holes for the Bolt
- Mark the center of the PVC pipe.
- Drill a hole through the center, ensuring the diameter matches the size of your carriage bolt.
3. Assemble the Bolt and Plates
- Insert the carriage bolt through the PVC pipe.
- Add a washer to each side of the bolt for stability.
- Secure the bolt with a wing nut on one end, leaving the other side open to add weight plates.
4. Add a Comfortable Grip
- Wrap the PVC pipe with foam or tape for a secure and comfortable grip.
5. Load the Plates
- Slide weight plates onto the open end of the bolt.
- Secure them in place with a washer and wing nut.
Pro Tips for DIY Tib Bar Success
- Double-check your bolt size: A snug fit ensures safety and stability.
- Experiment with weight placement: Start light and gradually increase load as you build strength.
- Customize the grip: Use gym-grade tape or foam padding for a more professional feel.
- Stability test: Before using your Tib Bar, give it a few test shakes to ensure everything is secure.
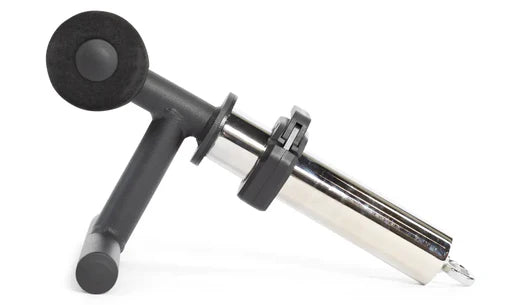
Alternative: A High-Quality Tib Bar You Can Buy
While building your own Tib Bar is cost-effective and rewarding, it’s not for everyone.
If DIY projects feel daunting or you want a professional-grade tool, consider the Bells of Steel Tibialis Trainer Bar. Designed for durability and ease of use, it offers:
- Superior Build Quality: Made with high-grade materials to withstand heavy loads.
- Comfortable Grip: Pre-installed padding ensures a secure and ergonomic hold.
- Versatility: It works with Olympic plates, resistance bands, and cable machines for improved versatility.
Final Thoughts
Whether you’re a DIY enthusiast or prefer ready-made solutions, building your own Tib Bar is a fun and budget-friendly project.
But if convenience is your priority, the Bells of Steel Tibialis Trainer Bar is a fantastic alternative. Either way, incorporating this tool into your routine will help you build stronger, more resilient legs for better performance and injury prevention!


